
Daz 3d How to Manually Install Content
The daz 3d install manager automatically installs content for you that you have downloaded via the the daz 3d website. This makes installation of official DAZ content a breeze, but what about the multitude of third party content out there?
At first this may seem rather confusing but we will guide you through the process. Firstly you need to locate where your public daz 3d folder is. On a Typical windows installation you will have two locations where you will find daz library folders. One will be
1. C:\Users\”username”\Documents\DAZ 3D\Studio\My Library
and another will be:
2. C:\Users\Public\Public Documents\My DAZ 3D Library
You need to install your content in the Second one. Most reputable content providers include instructions in the READ ME file about how to install the content, but generally it goes as follows:
When you examine the folder structure of your new content you will notice that it corresponds with your Daz Library folder structure. There will be various subfolders included.
Copy all of the content from these folders into the correct locations. For example if your new content has the folder structure of:
CONTENT
————–DATA
———————–bobhair.duf
you will need to copy the file bobhair.duf to the DATA Folder located in your DAZ Library folder. Do not delete or edit the Data folder in your DAZ Library as this will break your existing content. Just simply add your new content and then repeat this process for all the remaining folders.
To make this clearer lets take a step by step look at another example.
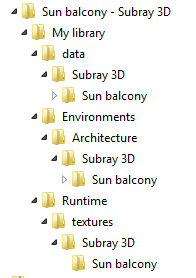
Here we have a folder for the Sun balcony addon by Subray 3D. Inside is the ‘My library’ folder. In the case of daz studio this normally refers to C:UsersPublicDocumentsMy DAZ 3D.
- Open the data folder in your own Daz Library. Does it include already include a folder called Subray 3D? If it doesn’t, copy and paste the new Subray 3D folder into your data folder and your done! If it does already contain this folder we have to go a level deeper and focus on the Sun Balcony folder. If there were mutliple nested folders we would keep going untill we find a folder in your DAZ Library that doesn’t already contain the same files as your new content.
- Repeat this process for the Environments folder. It should normally contain an Architecture folder by default so open this folder. Is there a Subray 3d folder inside? Is there a Sun Balcony folder inside this one? Repeat the same process from above. Do the same for the Runtime folder and you should soon get the hang of it!
You should now be able to find your new content within DAZ Studio by using the smart content tab or the regular content tab. If for any reason you cannot see it try closing and reopening DAZ Studio. If your content contained metadata or you can’t find it, you can refresh the database by clicking on the icon at the top right of the content or smart content tab and selecting reimport content metadata.
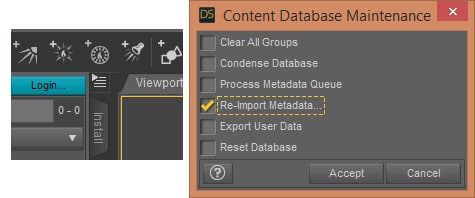
If you cant find new content, look for this icon and select ‘Content Database Maintenance’. Tick the Re-Import Metadata box and click Accept
If you liked this, here’s another great Daz 3D Tutorial to check out!